 React脚手架介绍
# React脚手架介绍
# create-react-app
# React脚手架安装使用
- 脚手架库:create-react-app
- 技术架构:react + webpack + es6 + eslint
- 创建项目并启动:
- 全局安装:
npm install -g create-react-app - 切换到想要创建项目的目录
- 使用命令:
create-react-app xxxx - 进入项目文件夹:
cd xxx - 启动项目:
npm start
- 全局安装:
Success! Created react_staging at /Users/zouquchen/study-dev/React-Study/react_staging
Inside that directory, you can run several commands:

  npm start
    Starts the development server.

  npm run build
    Bundles the app into static files for production.

  npm test
    Starts the test runner.

  npm run eject
    Removes this tool and copies build dependencies, configuration files
    and scripts into the app directory. If you do this, you can’t go back!

We suggest that you begin by typing:

  cd react_staging
  npm start

Happy hacking!
1
2
3
4
5
6
7
8
9
10
11
12
13
14
15
16
17
18
19
20
21
22
2
3
4
5
6
7
8
9
10
11
12
13
14
15
16
17
18
19
20
21
22
npm run eject:运行后,webpack所有的配置都会暴露出来供开发人员修改。暴露后就不能改回去了。
# React脚手架文件介绍
Root
|-- public
|	 |-- favicon.ico   					偏爱图标
|	 |-- index.html						网站首页,用于承载项目,整个项目只有一个HTML
|	 |-- manifest.json					应用加壳时的配置文件
|	 |-- robots.txt						爬虫规则文件
|
|-- src
 	 |-- App.css						样式文件
 	 |-- App.js							定义组件并暴露出去
 	 |-- App.test.js					测试文件,通常不使用
 	 |-- index.css						通用样式文件
 	 |-- index.js						入口文件,引入App组件,渲染页面
 	 |-- reportWebVitals.js				用于记录页面性能检测
 	 |-- setupTests.js					用于应用整体测试
1
2
3
4
5
6
7
8
9
10
11
12
13
14
15
2
3
4
5
6
7
8
9
10
11
12
13
14
15
index.html
<!DOCTYPE html>
<html lang="en">
  <head>
    <meta charset="utf-8" />
    <!-- PUBLIC_URL 代表public文件夹路径 -->
    <link rel="icon" href="%PUBLIC_URL%/favicon.ico" />
    <!-- 用于开启理想视口,用于做移动端网页的适配 -->
    <meta name="viewport" content="width=device-width, initial-scale=1" />
    <!-- 用于配置浏览器页签+地址栏的颜色(仅支持安卓手机浏览器,兼容性不是很好,很少用) -->
    <meta name="theme-color" content="#000000" />
    <!-- 网站描述信息 -->
    <meta name="description" content="Web site created using create-react-app"/>
    <!-- 苹果手机safair,用于指定网页添加到主屏幕后的图标 -->
    <link rel="apple-touch-icon" href="%PUBLIC_URL%/logo192.png" />
    <!-- 应用加壳时的配置文件-->
    <link rel="manifest" href="%PUBLIC_URL%/manifest.json" />

    <title>React App</title>
  </head>
  <body>
    <!-- 若浏览器不支持JS,则是展示标签中的内容 -->
    <noscript>You need to enable JavaScript to run this app.</noscript>
    <!-- 容器 -->
    <div id="root"></div>
  </body>
</html>
1
2
3
4
5
6
7
8
9
10
11
12
13
14
15
16
17
18
19
20
21
22
23
24
25
26
2
3
4
5
6
7
8
9
10
11
12
13
14
15
16
17
18
19
20
21
22
23
24
25
26
<React.StrictMode>:用于检查React代码是否规范。如果包含一些弃用的方法会有提示。
# 配置代理
# 前置说明
- React 本身只关注于界面,并不包含发送 ajax 请求的代码
- 前端应用需要通过 ajax 请求与后台进行交互(json 数据)
- react应用中需要集成第三方ajax 库
# 常用 ajax 请求库
- jQuery:比较重,如果需要另外引入不建议使用-
- axios: 轻量级,建议使用
- 封装 XmlHttpRequest 对象的 ajax
- promise 风格
- 可以用在浏览器端和 node 服务器端
# 安装 ajax
npm install axios
1
# 配置代理
所谓同源(即指在同一个域)就是两个页面具有相同的协议(protocol),主机(host)和端口号(port), 当一个请求url的协议、域名、端口三者之间任意一个与当前页面url不同即为跨域 。
那么react通过代理解决跨域问题呢
方法一
在package.json中追加如下配置
{
  ...,
  "proxy":"请求的地址"
}
1
2
3
4
2
3
4
说明:
- 优点:配置简单,前端请求资源时可以不加任何前缀。
- 缺点:不能配置多个代理。
- 工作方式:上述方式配置代理,当请求了3000不存在的资源时,那么该请求会转发给5000 (优先匹配前端资源)
方法二
第一步:创建代理配置文件
在src下创建配置文件:src/setupProxy.js1编写setupProxy.js配置具体代理规则:
const { createProxyMiddleware } = require('http-proxy-middleware')

module.exports = function(app) {
  app.use(
    createProxyMiddleware('/api1', {  //api1是需要转发的请求(所有带有/api1前缀的请求都会转发给5000)
      target: 'http://localhost:5000', //配置转发目标地址(能返回数据的服务器地址)
      changeOrigin: true, //控制服务器接收到的请求头中host字段的值
      /*
      	changeOrigin设置为true时,服务器收到的请求头中的host为:localhost:5000
      	changeOrigin设置为false时,服务器收到的请求头中的host为:localhost:3000
      	changeOrigin默认值为false,但我们一般将changeOrigin值设为true
      */
      pathRewrite: {'^/api1': ''} //去除请求前缀,保证交给后台服务器的是正常请求地址(必须配置)
    }),
    createProxyMiddleware('/api2', {
      target: 'http://localhost:5001',
      changeOrigin: true,
      pathRewrite: {'^/api2': ''}
    })
  )
}
1
2
3
4
5
6
7
8
9
10
11
12
13
14
15
16
17
18
19
20
21
说明:
- 优点:可以配置多个代理,可以灵活的控制请求是否走代理。
- 缺点:配置繁琐,前端请求资源时必须加前缀。
# NextJS创建项目
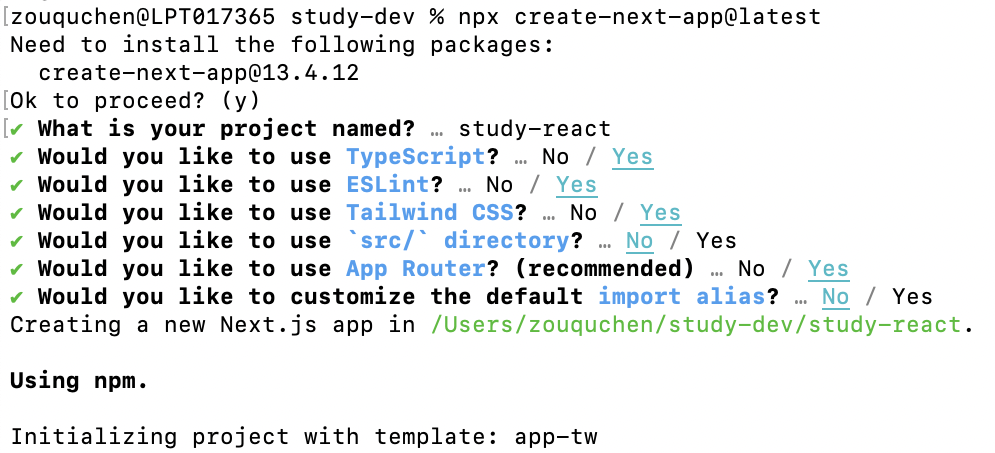
终端输入:
npx create-next-app@latest
1
在安装过程中,填入相关信息:

启动项目:npm run dev
编辑 (opens new window)
上次更新: 2023/08/24, 15:52:58
