 React组件
# React组件
# React插件
网页还处于开发者模式,代码没有打包上线:

正常状态:

# React组件介绍
# 函数式组件
<!DOCTYPE html>
<html lang="en">
  <head>
    <meta charset="UTF-8" />
    <meta name="viewport" content="width=device-width, initial-scale=1.0" />
    <title>Document</title>
  </head>
  <body>
    <!-- 准备好“容器” -->
    <div id="test"></div>

    <script type="text/javascript" src="../React-js/react.development.js"></script>
    <script type="text/javascript" src="../React-js/react-dom.development.js"></script>
    <script type="text/javascript" src="../React-js/babel.min.js"></script>

    <script type="text/babel">
        // 创建组件
        function MyComponent() {
	        console.log(this) // undefined
            return <h2>我是用函数定义的组件</h2>
        }
        // 渲染组件
        ReactDOM.render(<MyComponent/>, document.getElementById("test"))
    </script>
  </body>
</html>
2
3
4
5
6
7
8
9
10
11
12
13
14
15
16
17
18
19
20
21
22
23
24
25
26
可以通过开发者插件查看:

这里的this是undefined,代码是通过Babel编译的,开启了严格模式(ES5),禁止自定义函数里的this指向window,所以只能是undefined。

执行了ReactDOM.render(<MyComponent/>, document.getElementById("test"))后:
- React解析组件标签,找到了MyComponent组件
- 发现组件是使用函数定义的,随后调用该函数,将返回的虚拟DOM转为真实DOM,随后呈现在页面中。
# 类式组件
# 类的知识点
- 类中的构造器不是必须写的,要对实例进行一些初始化的操作,如添加指定属性时。
- 如果A类继承了B类,且A类中写了构造器,那么A类构造器中的super是必须要嗲用的。
- 类中所定义的方法,都是放在了类的原型对象上。
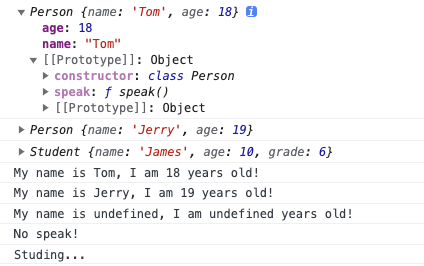
// Create Class Person
class Person {
	// 构造器中的this指的是类的实例对象
	constructor(name,age){
		this.name = name
		this.age = age
	}
	speak(){
		// 该方法放在了类的原型对象上,供实例使用
		// 通过Person实例调用speak时,speak中的this就是Person实例
		console.log(`My name is ${this.name}, I am ${this.age} years old!`);
	}
}

class Student extends Person {
	constructor(name, age, grade){
		super(name, age)
		this.grade = grade
	}
	speak() {
		console.log("No speak!")
	}
	study() {
		console.log("Studing...")
	}
}

const p = new Person('Tom', 18)
const d = new Person('Jerry', 19)
const s = new Student('James', 10, 6)
console.log(p);
console.log(d);
console.log(s)
p.speak();
d.speak();
p.speak.call({a:1, b:2});  // call可以更改函数中this的指向
s.speak();
s.study();
2
3
4
5
6
7
8
9
10
11
12
13
14
15
16
17
18
19
20
21
22
23
24
25
26
27
28
29
30
31
32
33
34
35
36
37
38
# 类式组件
<script type="text/babel">
	// 创建组件
	class MyComponent extends React.Component {
		render() {
			// this是MyComponent的实例对象
			console.log(this);
			return <h2>我是类定义的组件</h2>
		}
	}
	// 渲染组件
	ReactDOM.render(<MyComponent/>, document.getElementById("test"))
</script>
2
3
4
5
6
7
8
9
10
11
12
执行了ReactDOM.render(<MyComponent/>, document.getElementById("test"))后:
- React解析组件标签,找到了MyComponent组件
- 发现组件是使用类定义的,随后new出来该类的实例,并通过实例调用到原型上的方法的render方法
- 将render返回的虚拟DOM转为真实DOM,随后呈坎在页面中。
# 三大属性
# 状态state
复杂组件指有状态state的组件,state在组件实例上。
人-状态-影响-行为
组件-状态-驱动-页面

状态初始化:
<script type="text/babel">
	// 创建组件
	class MyComponent extends React.Component {
		constructor(props){
			super(props)
			this.state = {isHot:true}
		}
		render() {
			// this是MyComponent的实例对象
			console.log(this);
			return <h2>Today is {this.state.isHot ? 'Hot' : 'Cool'}</h2>
		}
	}
	// 渲染组件
	ReactDOM.render(<MyComponent/>, document.getElementById("test"))
</script>
2
3
4
5
6
7
8
9
10
11
12
13
14
15
16
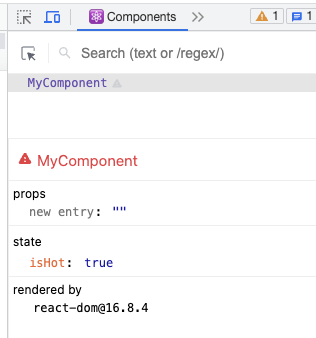
state是一个对象
原生事件绑定:JS的原生绑定方式
<body>
    <button id="btn1">Button1</button>
    <button id="btn2">Button2</button>
    <button id="btn3" onclick="demo()">Button3</button>

    <script>
        const btn1 = document.getElementById('btn1')
        btn1.addEventListener('click',()=>{
            alert('btn1 is clicked')
        })

        const btn2 = document.getElementById('btn2')
        btn2.onclick = () => {
            alert('btn2 is clicked')
        }

        function demo() {
            alert('btn3 is clicked')
        }
    </script>
</body>
2
3
4
5
6
7
8
9
10
11
12
13
14
15
16
17
18
19
20
21
React事件绑定
onclick要换成onClick<h2 onClick={demo()}>表示onClick的值为demo()执行后的返回值<h2 onClick={demo}>表示按键触发demo函数- 类中所有定义的方法,它在局部都开启了严格模式。
// 直接调用
function demo(){
	console.log(this)
}
// 直接调用
demo() // 输出window

function demo(){
	'use strcit'
	console.log(this)
}
// 直接调用
demo() // 输出undefined
2
3
4
5
6
7
8
9
10
11
12
13
bind()方法返回新的方法,并不会执调用this.changeWeather = this.changeWeather.bind(this)解决this指向问题- 状态里面的数据不可以直接修改,要使用内置API进行更改。
<script type="text/babel">
	const btn = document.getElementById('btn');
	// 创建组件
	class Weather extends React.Component {
		constructor(props){
			super(props)
			this.state = {isHot:true}
			// 拿原型上的生成后放在实例上
			this.changeWeather = this.changeWeather.bind(this)  // 解决this指向问题
		}
		render() {
			const {ishot} = this.state
			return <h2 onClick={this.changeWeather}>Today is {this.state.isHot ? 'Hot' : 'Cool'}</h2>
		}
		changeWeather() {
			// 通过Weather实例调用ChangeWeather时,changeWeather中的this就是Weater实例
			// 由于changeWeather是作为onClick的回调,所以不是通过实例调用的,是直接调用。
			// 类中方法默认开启了局部严格模式,this也不是window
			// this.state.isHot = !this.state.isHot
			console.log(this)
		}
	}
	// 渲染组件
	ReactDOM.render(<Weather/>, document.getElementById("test"))

</script>
2
3
4
5
6
7
8
9
10
11
12
13
14
15
16
17
18
19
20
21
22
23
24
25
26
- 构造器调用1次
- render调用n+1次,1次初始化,n次状态更新的次数
- 构造器:初始化状态、解决this指向问题
<script type="text/babel">
	// 创建组件
	class Weather extends React.Component {
		constructor(props){ // 构造器调用1次
			super(props)
			this.state = {isHot:true, wind:'wind'}
			// 拿原型上的生成后放在实例上
			this.changeWeather = this.changeWeather.bind(this)  // 解决this指向问题
		}
		render() { // render调用n+1次,1次初始化,n次状态更新的次数
			const {isHot, wind} = this.state
			return <h2 onClick={this.changeWeather}>Today is {isHot ? 'Hot' : 'Cool'}, {wind}</h2>
		}
		changeWeather() {
			// 通过Weather实例调用ChangeWeather时,changeWeather中的this就是Weater实例
			// 由于changeWeather是作为onClick的回调,所以不是通过实例调用的,是直接调用。
			// 类中方法默认开启了局部严格模式,this也不是window
			const isHot = this.state.isHot
			this.setState({isHot:!isHot})
		}
	}
	// 渲染组件
	ReactDOM.render(<Weather/>, document.getElementById("test"))
0
</script>
2
3
4
5
6
7
8
9
10
11
12
13
14
15
16
17
18
19
20
21
22
23
24
25
26
简化写法:
// 创建组件
class Weather extends React.Component {
	// 初始化状态
	state = {isHot:true, wind:'wind'}
	render() {
		const {isHot, wind} = this.state
		return <h2 onClick={this.changeWeather}>Today is {isHot ? 'Hot' : 'Cool'}, {wind}</h2>
	}
	// 自定义方法,要用赋值语句的形式+箭头函数
	changeWeather = () => {
		const isHot = this.state.isHot
		this.setState({isHot:!isHot})
	}
}
// 渲染页面
ReactDOM.render(<Weather/>, document.getElementById("test"))
2
3
4
5
6
7
8
9
10
11
12
13
14
15
16
- 组件中render方法中的this为组件实例对象
- 组件自定义的方法中this为undefined解决方法:
- 强制绑定this:通过函数对象的bind()
- 箭头函数
- 状态数据,不能直接修改或更新
# 属性Props
# 传递 props
简单使用:属性可以直接在创建组件的时候传入
<body>
    <!-- 准备好“容器” -->
    <div id="test1"></div>
    <div id="test2"></div>
    <script type="text/javascript" src="../React-js/react.development.js"></script>
    <script type="text/javascript" src="../React-js/react-dom.development.js"></script>
    <script type="text/javascript" src="../React-js/babel.min.js"></script>

    <script type="text/babel">
        // 创建组件
        class Person extends React.Component {
            render() {
                const {name, age, sex} = this.props
                return (
                    <div>
                        <ul>
                            <li>姓名:{name}</li>
                            <li>年龄:{age}</li>
                            <li>性别:{sex}</li>
                        </ul>
                    </div>
                )
            }
        }
        // 渲染页面
        ReactDOM.render(<Person name="tom" age="18" sex="girl" />, document.getElementById("test1"))
        ReactDOM.render(<Person name="jerry" age="19" sex="boy" />, document.getElementById("test2"))
    </script>
</body>
2
3
4
5
6
7
8
9
10
11
12
13
14
15
16
17
18
19
20
21
22
23
24
25
26
27
28
29
当组件内属性太多时,可以这么【批量传递标签属性】或者说【批量传递属性】:
const p = {name:"xxx", age:"14", sex:"boy"}
ReactDOM.render(<Person {...p} />, document.getElementById("test1"))
2
{...p}
- 在JS里,展开运算符不是展开对象,而是复制对象;
- 在React里,花括号是分隔符,
...p表示展开对象,但不能随意使用,只能在标签属性的传递。
# 限制 props
添加规则:必要性、类别、默认值
需要引入 prop-types.js ,对组件标签进行限制,全局就会多了 PropTypes
// 创建组件
class Person extends React.Component {
	render() {
		const {name, age, sex} = this.props
		return (
			<div>
				<ul>
					<li>姓名:{name}</li>
					<li>年龄:{age}</li>
					<li>性别:{sex}</li>
				</ul>
			</div>
		)
	}
	speak() {
		console.log("xaxa");
	}
}
// 限制规则
Person.propTypes = {
	name:PropTypes.string.isRequired,  // name是字符串类型,且为必填项
	sex:PropTypes.string,
	age:PropTypes.number,
	speak:PropTypes.func,  // 限制为函数
}
// 默认值设置
Person.defaultProps = {
	sex:"none",
	age:18
}
2
3
4
5
6
7
8
9
10
11
12
13
14
15
16
17
18
19
20
21
22
23
24
25
26
27
28
29
30
props是只读的,不能修改,如this.props.name = "Jerry"
简写:限制条件从外侧转移到类里面
// 创建组件
class Person extends React.Component {
	// 限制规则
	static propTypes = {
		name:PropTypes.string.isRequired,  // name是字符串类型,且为必填项
		sex:PropTypes.string,
		age:PropTypes.number,
		speak:PropTypes.func,  // 限制为函数
	}
	// 默认值设置
	static defaultProps = {
		sex:"none",
		age:18
	}
	render() {
	}
	speak() {
	}
}

// 渲染页面
const p = {name:"xxx", age:14, sex:"boy"}
ReactDOM.render(<Person {...p} />, document.getElementById("test1"))
2
3
4
5
6
7
8
9
10
11
12
13
14
15
16
17
18
19
20
21
22
23
构造器是否接收props,是否传递给super,取决于是否希望在构造器中通过this访问props,但是这种场景基本用不到。
constructor(props) {
	console.log(props)
	super(props)
	console.log(this.props)
}
2
3
4
5
函数式组件只能使用props,条件限制只能写在函数外侧,不能使用state和ref
function Person(props) {
	const {name, age, sex} = props
	return (
		<ul>
			<li>姓名:{name}</li>
			<li>年龄:{age}</li>
			<li>性别:{sex}</li>
		</ul>
	)
}
// 渲染页面
const p = {name:"Jerry", age:14, sex:"boy"}
ReactDOM.render(<Person {...p} />, document.getElementById("test1"))
2
3
4
5
6
7
8
9
10
11
12
13
# 引用refs
# 字符串形式
不推荐使用字符串类型的ref,因为它存在一些问题(效率问题),未来的版本可能移除。
class MyComponent extends React.Component {
// 展示左侧输入框数据
showData = () => {
console.log(this.refs.input1.value);
}
// 展示右侧输入框数据
showData2 = () => {
console.log(this.refs.input2.value);
}
render() {
return(
<div>
<input ref="input1" type="text" placeholder="Push button show data"/>
<button ref="button" onClick={this.showData}>push show right data</button>
<input ref="input2" onBlur={this.showData2} type="text" placeholder="Onblur show data"/>
</div>
)
}
}
// 渲染页面
ReactDOM.render(<MyComponent />, document.getElementById("test1"))
2
3
4
5
6
7
8
9
10
11
12
13
14
15
16
17
18
19
20
21
# 回调函数形式
class MyComponent extends React.Component {
// 展示左侧输入框数据
showData = () => {
console.log(this.refs.input1.value);
}
// 展示右侧输入框数据
showData2 = () => {
console.log(this.refs.input2.value);
}
render() {
return(
<div>
<input ref={c => this.input1 = c} type="text" placeholder="Push button show data"/>
<button ref="button" onClick={this.showData}>push show right data</button>
<input onBlur={this.showData2} ref={c => this.input3 = c} type="text" placeholder="Onblur show data"/>
</div>
)
}
}
// 渲染页面
ReactDOM.render(<MyComponent />, document.getElementById("test1"))
2
3
4
5
6
7
8
9
10
11
12
13
14
15
16
17
18
19
20
21
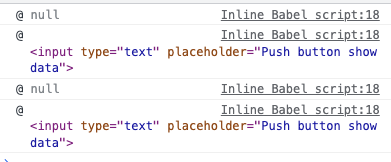
ref={(a) => {console.log(a)}}:输出的是当前节点,也是说ref中参数值得是当前节点。
# 回掉执行次数的问题
如果 ref 回调函数是以内联函数的方式定义的,在更新过程中它会被执行两次,第一次传入参数null,然后第二次会传入参数DOM 元素。这是因为在每次清染时会创建一个新的函数实例,所以React 清空旧的ref 并且设置新的。
通过将 ref 的回调函数定义成 class 的绑定函数的方式可以避免上述问题,但是大多数情况下它是无关紧要的。
class MyComponent extends React.Component {
state = {isHot:true}
changeWeather = () => {
const {isHot} = this.state
this.setState({isHot:!isHot})
}
render() {
return(
<div>
<h2>今天天气很{this.state.isHot ? 'Hot' : 'Cool '}</h2>
<input ref={c => {this.input1 = c; console.log('@', c)}} type="text" placeholder="Push button show data"/>
<button onClick={this.changeWeather}>Change Weather</button>
</div>
)
}
}
// 渲染页面
ReactDOM.render(<MyComponent />, document.getElementById("test1"))
2
3
4
5
6
7
8
9
10
11
12
13
14
15
16
17
18
写注释:{/* */}
通过调用类函数的方法改进,不过写成内联的也没关系。
class MyComponent extends React.Component {
state = {isHot:true}
showData = () => {
const {input1} = this
console.log(input1.value);
}
changeWeather = () => {
const {isHot} = this.state
this.setState({isHot:!isHot})
}
saveInput = (c) => {
this.input1 = c;
console.log('@', c);
}
render() {
return(
<div>
<h2>今天天气很{this.state.isHot ? 'Hot' : 'Cool '}</h2>
{/*<input ref={c => {this.input1 = c; console.log('@', c)}} type="text" placeholder="Push button show data"/> */}
<input ref={this.saveInput} type="text"/>
<button ref="button" onClick={this.showData}>push show right data</button>
<button onClick={this.changeWeather}>Change Weather</button>
</div>
)
}
}
// 渲染页面
ReactDOM.render(<MyComponent />, document.getElementById("test1"))
2
3
4
5
6
7
8
9
10
11
12
13
14
15
16
17
18
19
20
21
22
23
24
25
26
27
28
29
30
# createRef
React.createRef():调用后可以返回一个容器,该容器可以存储被ref所标识的节点,该容器是专人专用,里面只能存储一个。
class MyComponent extends React.Component {
myRef = React.createRef()
myRef2 = React.createRef()
// 展示左侧输入框数据
showData = () => {
console.log(this.myRef.current.value);
}
showData2 = () => {
console.log(this.myRef2.current.value);
}
render() {
return(
<div>
<input ref={this.myRef} type="text" placeholder="Push button show data"/>
<button onClick={this.showData}>push show right data</button>
<input onBlur={this.showData2} ref={this.myRef2} type="text"/>
</div>
)
}
}
// 渲染页面
ReactDOM.render(<MyComponent />, document.getElementById("test1"))
2
3
4
5
6
7
8
9
10
11
12
13
14
15
16
17
18
19
20
21
22
- 通过onXxx属性指定事件处理函数(注意大小写)
- React使用的是自定义(合成)时间,而不是使用原始DOM事件 —— 为了更好的兼容性
- React中的事件是通过事件委托方式处理的(委托给组件最外层的元素) —— 为了高效
- 通过event.target得到发生事件的DOM元素对象
避免过度使用ref,发生事件的元素正好是操作的元素,可以不使用ref。
showData2 = () => {
	console.log(event.target.value);
}

<input onBlur={this.showData2} type="text"/>
2
3
4
5
# 收集表单数据
# 非受控组件
页面中所有输入类DOM,现用现取。
class Login extends React.Component {
	handleSubmit = (event) => {
		event.preventDefault()  // 阻止表单提交
		const {username, password} = this
		console.log(username.value, password.value);
	}
	render(){
		return(
			<form action="www.baidu.com" onSubmit={this.handleSubmit}>
				用户名:<input ref={c => this.username = c}type="text" name="username" />
				密码:<input ref={c => this.password = c}type="text" name="password" />
				<button>登陆</button>
			</form>
		)
	}
}

ReactDOM.render(<Login/>, document.getElementById('test'))
2
3
4
5
6
7
8
9
10
11
12
13
14
15
16
17
18
# 受控组件
页面内所有输入类的DOM,随着输入维护到状态state内,需要使用时直接从state内获取。(类似于vue的双向绑定)
现用现取就是非受控,随着输入维护状态就是受控。
class Login extends React.Component {
	state = {
		username:'',    // 用户名
		password:''     // 密码
	}
	handleSubmit = (event) => {
		event.preventDefault()  // 阻止表单提交
		const {username, password} = this.state
		alert
	}
	saveUsername = (evnet) => {
		this.setState({username:event.target.value})
	}
	savePassword = (event) => {
		this.setState({password:event.target.value})
	}
	render(){
		return(
			<form onSubmit={this.handleSubmit}>
				用户名:<input onChange={this.saveUsername} type="text" name="username" />
				密码:<input onChange={this.savePassword} type="password" name="password" />
				<button>登陆</button>
			</form>
		)
	}
}

ReactDOM.render(<Login/>, document.getElementById('test'))
2
3
4
5
6
7
8
9
10
11
12
13
14
15
16
17
18
19
20
21
22
23
24
25
26
27
28
# 高阶函数-函数柯里化
高阶函数:如果一个函数符合下面2个规范中的任何一个,那么该函数就是高阶函数。
- 若A函数,接收的参数是一个函数,那么A就可以称为高阶函数
- 若A函数,调用的返回值依然是一个函数,那么A就可以称为高阶函数。 常见的高阶函数:Promise、setTimeout、arr.map() 函数的柯里化:通过函数调用继续返回函数的方式,实现多次接收参数最后统一处理的函数编码形式。
优化save函数,不能有一个变量就写一个save函数,希望写一个通用函数save所有变量。
class Login extends React.Component {
	state = {
		username:'',    // 用户名
		password:''     // 密码
	}
	handleSubmit = (event) => {
		event.preventDefault()  // 阻止表单提交
		const {username, password} = this.state
		alert
	}
	saveFormData = (dataType) => {
		// onChange将调用下面的回调函数
		return (event) => {
			this.setState({[dataType]:event.target.value})
			console.log(dataType, event.target.value);
		}
	}
	render(){
		return(
			<form onSubmit={this.handleSubmit}>
				{/* 必须把一个函数将给onChange作为回调 */}
				用户名:<input onChange={this.saveFormData('username')} type="text" name="username" />
				密码:<input onChange={this.saveFormData('password')} type="password" name="password" />
				<button>登陆</button>
			</form>
		)
	}
}

ReactDOM.render(<Login/>, document.getElementById('test'))
2
3
4
5
6
7
8
9
10
11
12
13
14
15
16
17
18
19
20
21
22
23
24
25
26
27
28
29
30
如果不使用柯里化,可以这么写
saveFormData = (dataType, event) => {
	this.setState({[dataType]:event.target.value})
}

<input onChange={ event => this.saveFormData('username', event) } type="text" name="username" />
2
3
4
5
# 组件的生命周期
mount 挂载 unmount 卸载
生命周期回调函数 = 生命周期钩子函数 = 生命周期函数 = 生命周期钩子
理解:
- 组件从创建到死亡会经历一些特定的阶段
- React组件中包含一系列钩子函数,会在特定时刻调用
- 在定义组件时,会在特定的生命周期回调函数中做特定的工作 常用的钩子函数:
- render():初始化渲染或更新渲染调用
- componentDidMout():开启监听,发送ajax请求
- componentWillUnmount():做一些收尾工作,如:清理定时器
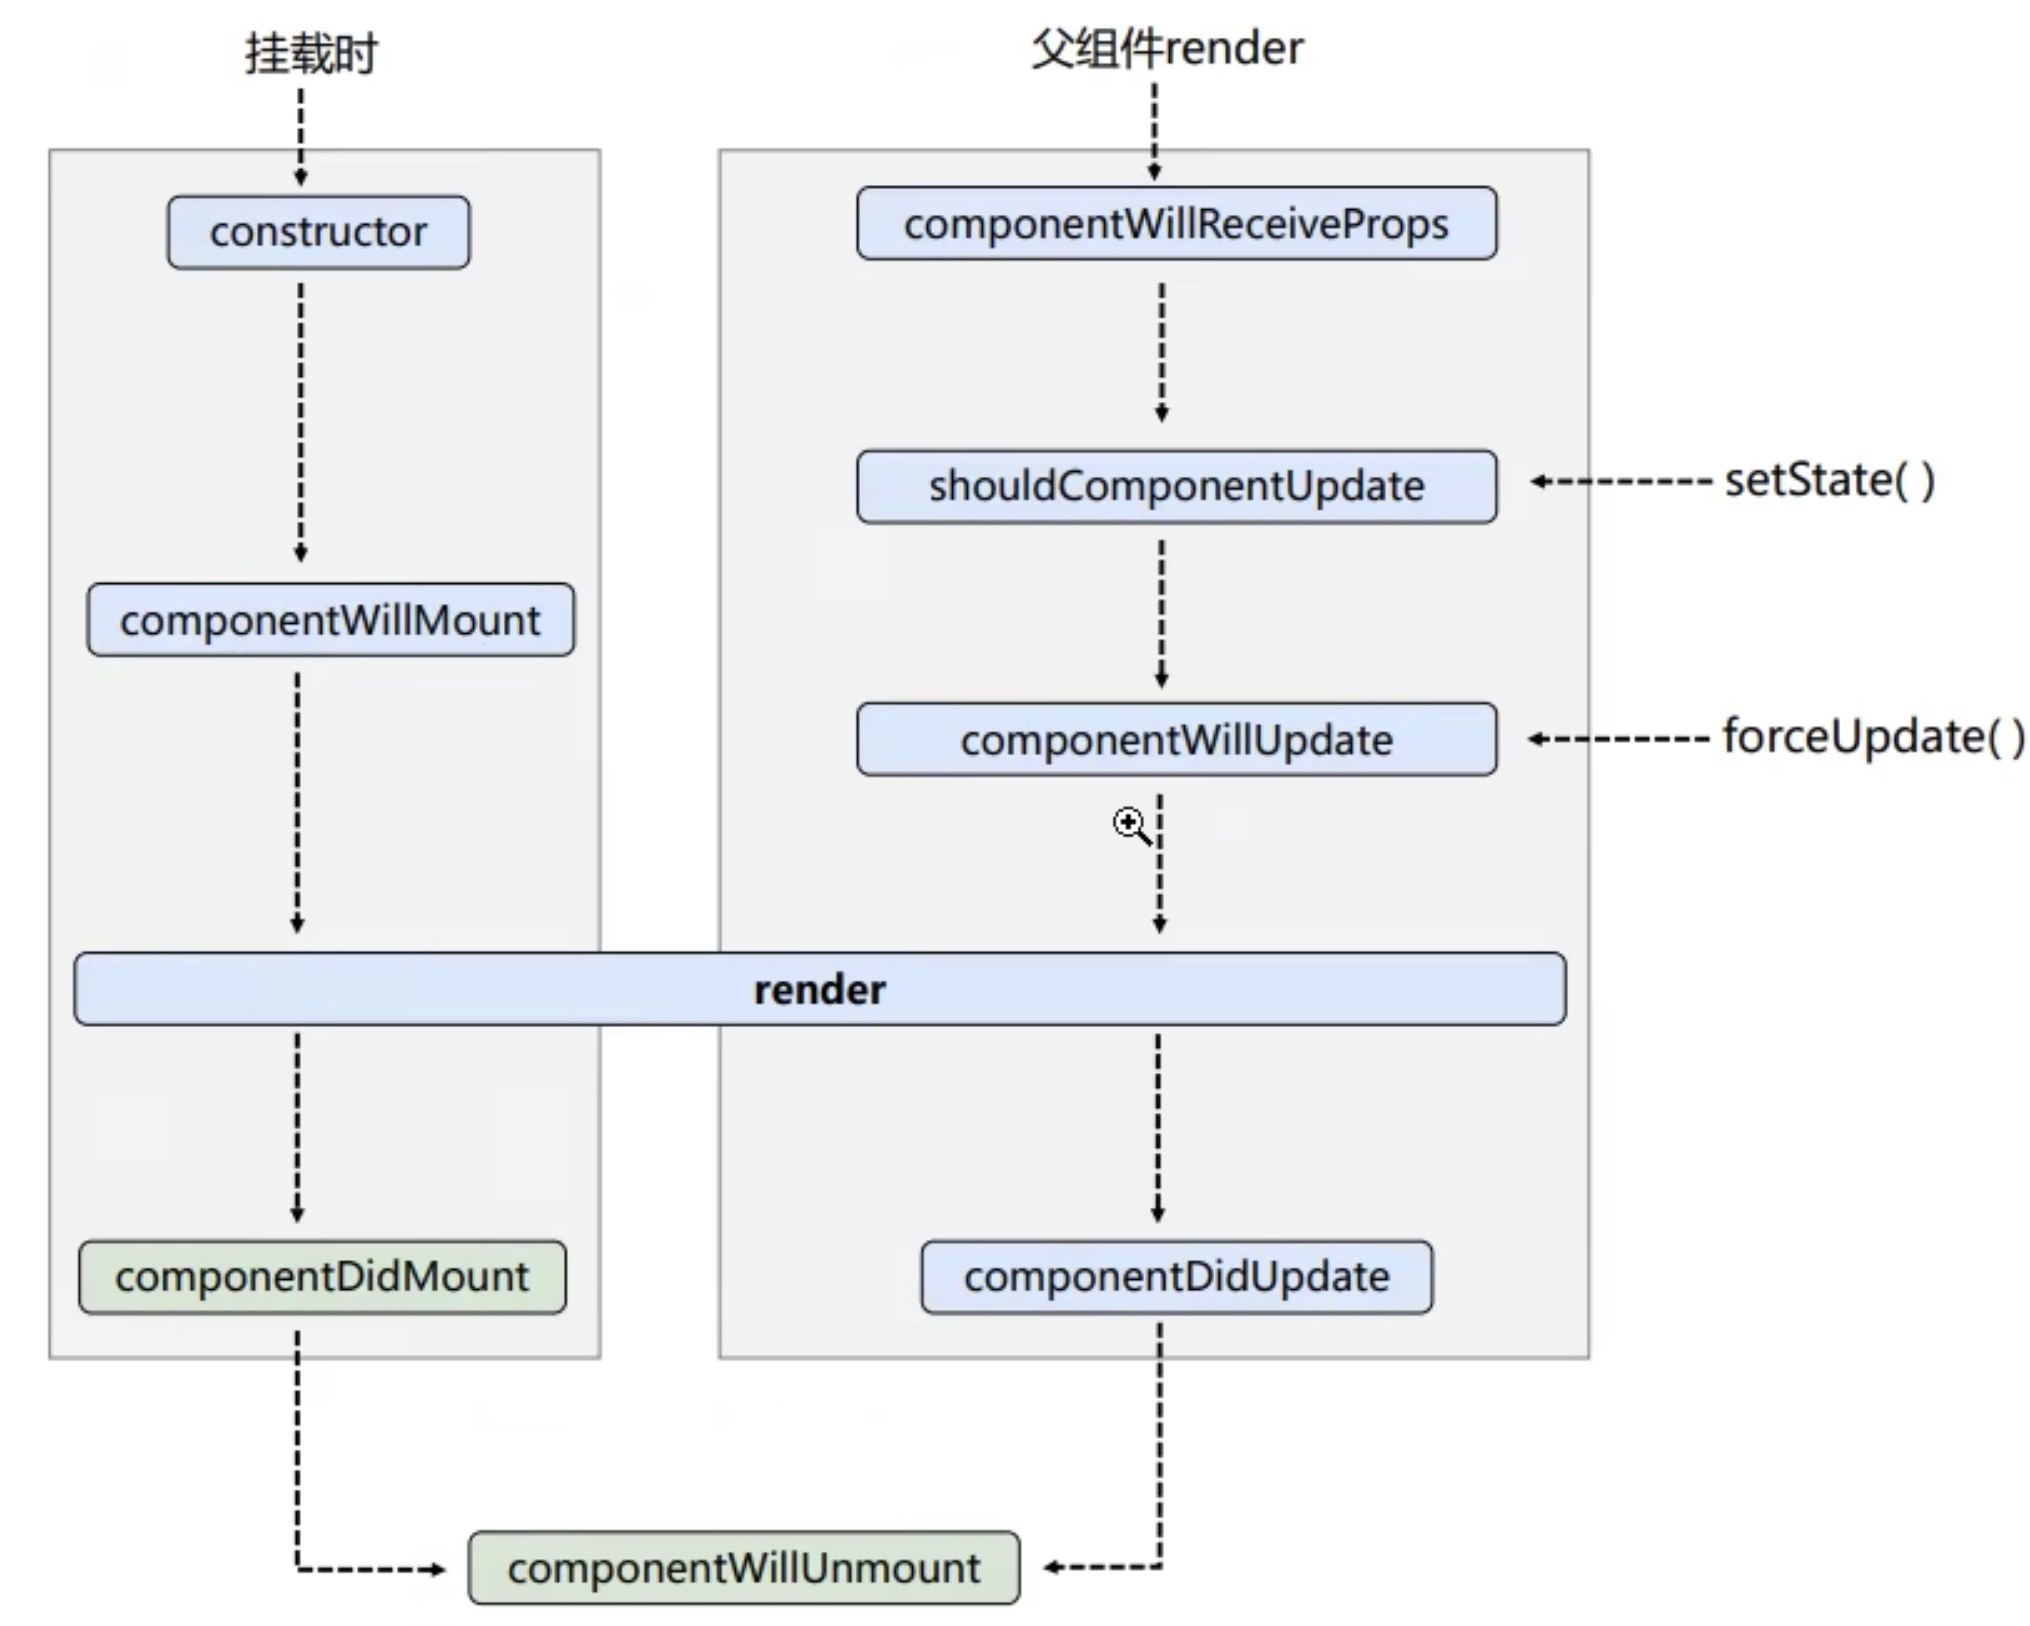
# 组件的生命周期(旧)
- 初始化阶段:由
ReactDOM.render()触发---初次渲染- constructor():构造器
- componentWillMount():组件将要挂载钩子
- render():渲染页面
- componentDidMount():组件挂载完毕钩子,一般用于初始化,例如:开启定时器、发送网络请求、订阅消息
- 更新阶段:由组件内部
this.setState()或父组件render()触发- shouldComponentUpdate():组件是否应该被更新,阀门,返回true继续进行,返回false就停止了。改方法如果不写,永远返回true。
- componentWillUpdate():组件将要更新钩子
- render():渲染页面
- componentDidUpdate():组件完成更新钩子
- 卸载组件:由组件内部
ReactDOM.unmountComponentAtNode()触发- componentWillUnmount():组件将要卸载钩子,常用于收尾工作,例如:关闭定时器、取消订阅消息
- componentWillReceiveProps():组件将要接收新的 props 钩子,第一次传不算,后面更新的才算。
- setState():更新 state 状态: shouldComponentUpdate -> componentWillUpdate -> render -> componentDidUpdate
- forceUpdate():强制更新,不对状态作出修改,组件也能修改,绕过阀门,componentWillUpdate -> render -> componentDidUpdate
生命周期流程图(旧)
<!DOCTYPE html>
<html lang="en">
<head>
    <meta charset="UTF-8">
    <meta name="viewport" content="width=device-width, initial-scale=1.0">
    <title>Document</title>
</head>
<body>
    <!-- 准备好“容器” -->
    <div id="test1"></div> <br><br><br>
    <div id="test2"></div>

    <script type="text/javascript" src="../React-js/react.development.js"></script>
    <script type="text/javascript" src="../React-js/react-dom.development.js"></script>
    <script type="text/javascript" src="../React-js/babel.min.js"></script>
    <script type="text/javascript" src="../React-js/prop-types.js"></script>
    <script type="text/babel">
        class Count extends React.Component {
            // 构造器
            constructor() {
                super()
                console.log("---constructor");
                this.state = {count:0}
            }
            // 组件将要挂载钩子
            componentWillMount() {
                console.log("---componentWillMount");
            }
            // 组件挂载完毕钩子
            componentDidMount() {
                console.log("---componentDidMount");
            }
            // 组件将要卸载钩子
            componentWillUnmount() {
                console.log("---componentWillUnmount");
            }
            // 控制组件更新阀门
            shouldComponentUpdate() {
                console.log("---shouldComponentUpdate");
                return true
            }
            // 组件将要更新钩子
            componentWillUpdate() {
                console.log("---componentWillUpdate");
            }
            // 组件更新完毕的钩子
            componentDidUpdate() {
                console.log("---componentDidUpdate");
            }

            add = () => {
                const {count} = this.state
                this.setState({count:count+1})
            }
            death = () => {  // 卸载组件
                ReactDOM.unmountComponentAtNode(document.getElementById('test1'))
            }
            force = () => {
                this.forceUpdate()
            }
            render() {  // 调用时机:初始化渲染、状态更新之后
                console.log("---render");
                const {count} = this.state
                return (
                    <div>
                        <h2>{count}</h2>
                        <h2>SUM: {count}</h2>
                        <button onClick={this.add}>Push +1</button>
                        <button onClick={this.death}>Unmount</button>
                        <button onClick={this.force}>Force Update</button>
                    </div>
                )
            }
        }

        class A extends React.Component {
            state = {carName:'Benz'}
            changeCar = () => {
                this.setState({carName: 'Auto'})
            }
            render() {
                return(
                    <div>
                        <div>A</div>
                        <button onClick={this.changeCar}>Change Car</button>
                        <B carName={this.state.carName}/>
                    </div>
                )
            }
        }
        class B extends React.Component {
            // 组件将要接收新的props钩子
            componentWillReceiveProps() {
                console.log("----componentWillReceiveProps");
            }
            render() {
                return(
                    <div>
                        <div>B,  {this.props.carName}</div>
                        <div>{this.props.carName}</div>
                    </div>


                )
            }
        }

        ReactDOM.render(<Count />, document.getElementById('test1'))
        ReactDOM.render(<A />, document.getElementById('test2'))
    </script>
</body>
</html>
2
3
4
5
6
7
8
9
10
11
12
13
14
15
16
17
18
19
20
21
22
23
24
25
26
27
28
29
30
31
32
33
34
35
36
37
38
39
40
41
42
43
44
45
46
47
48
49
50
51
52
53
54
55
56
57
58
59
60
61
62
63
64
65
66
67
68
69
70
71
72
73
74
75
76
77
78
79
80
81
82
83
84
85
86
87
88
89
90
91
92
93
94
95
96
97
98
99
100
101
102
103
104
105
106
107
108
109
110
111
112
# 组件的生命周期(新)
版本:17.0.1
- 初始化阶段:由
ReactDOM.render()触发---初次渲染- constructor()
- getDerivedStateFromProps()
- render()
- componentDidMount()
- 更新阶段:由组件内部
this.setState()或父组件render()触发- getDerivedStateFromProps()
- shouldComponentUpdate()
- render()
- getSnapshotBeforeUpdate()
- componentDidUpdate()
- 卸载组件:由组件内部
ReactDOM.unmountComponentAtNode()触发- componentWillUnmount()
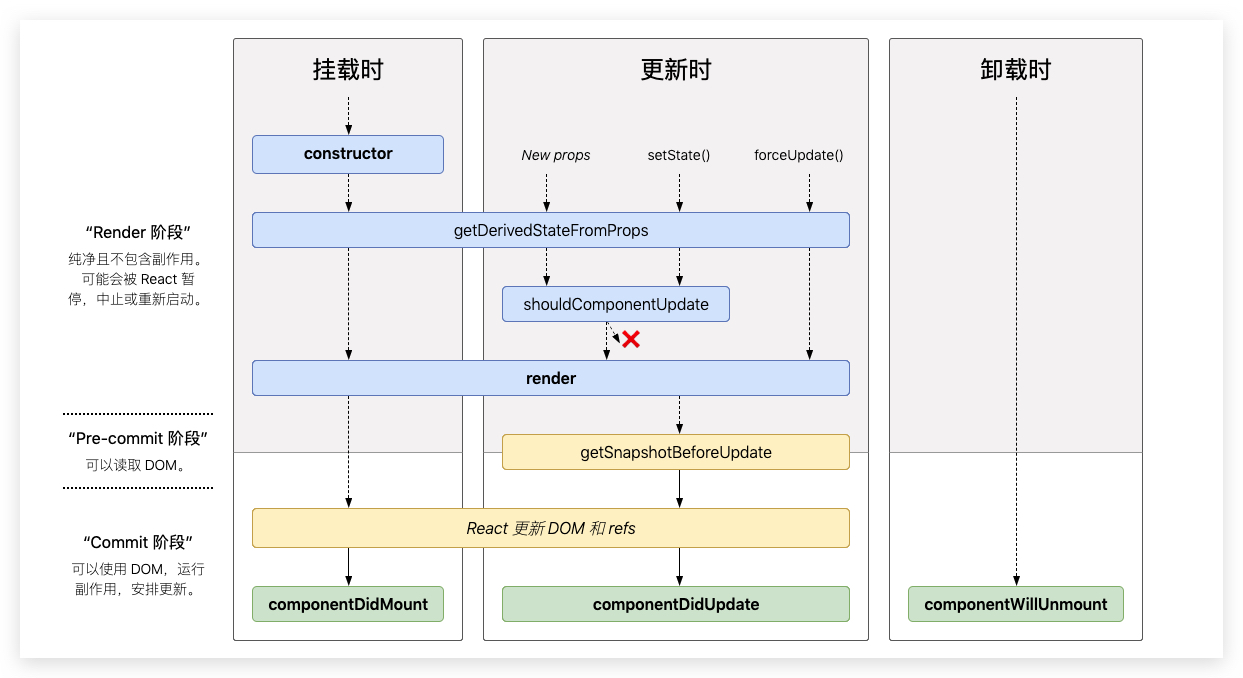
下面三个过时,需要加上UNSAFE,这些方法经常被滥用和误解,在异步渲染中,潜在的误用问题可能更大。
- UNSAFE_componentWillMount
- UNSAFE_componentWillUpdate
- UNSAFE_componentWillReceiveProps 不过这三个方法很少使用。
新钩子:
- getDerivedStateFromProps:不常用,state的值在任何时候都取决于props,但是难以维护,使用场景特别少。
- getSnapshotBeforeUpdate: 不常用,在最近一次渲染输出(提交到DOM节点)之前调用。它使得组件能在发生更改之前从DOM中捕获一些信息(例如,滚动位置)。此生命周期的任何返回值将作为参数传递给
componentDidUpdate()
getSnapshotBeforeUpdate(){
	console.log("---getSnapshotBeforeUpdate");
	return "zqc"
}
// 组件更新完毕的钩子
componentDidUpdate(prevProps,prevState,snapshot) {
	console.log("---componentDidUpdate", prevProps,prevState,snapshot);
}
2
3
4
5
6
7
8
案例:每秒钟列表生成一条数据,但是显示框的高度不变,当数据超出显示框的范围时出现滚动条。当移动滚动条时,展示的数据固定位置,而不会跟随生成的数据而移动。
class NewsList extends React.Component{
	state = {newsArr:[]}
	componentDidMount() {
		setInterval(()=>{
			const {newsArr} = this.state
			const news = '新闻' +  (newsArr.length + 1)
			this.setState({newsArr:[news, ...newsArr]})
		},1000)
	}
	getSnapshotBeforeUpdate() {
		return this.refs.list.scrollHeight
	}
	componentDidUpdate(prevProps, preState, height) {
		this.refs.list.scrollTop += this.refs.list.scrollHeight - height
	}
	render(){
		return(
			<div className="list" ref="list">
				{
					this.state.newsArr.map((n, index) => {
						return <div className="news" key={index}>{n}</div>
					})
				}
			</div>
		)
	}
}

ReactDOM.render(<NewsList/>, document.getElementById('test'))
2
3
4
5
6
7
8
9
10
11
12
13
14
15
16
17
18
19
20
21
22
23
24
25
26
27
28
29
